网站搭建和主题配置
由于上文已经非常完善,笔者只提几点注意事项(均为笔者踩的坑)
关于_config.yml中deploy的branch的配置,master要更换为main
关于 url 配置,文章中没有提到,但是笔者在搭建时发现,url 对大小写要求很严格 ,如果你的 github 域名没有完全正确的填写,那么网站的样式是加载不出来的
CNAME 必须移到source文件夹中进行保留
链接永久化
减少网页链接丢失,同时减少 url 的层级,对爬虫比较友好
如何实现
下载插件hexo-abbrlink
1 npm install hexo-abbrlink --save
在根目录中的_conflg.yml中配置生成链接
1
2
3
4
permalink: zierc/:abbrlink.html abbrlink: alg: crc32 # 算法:crc16(default) and crc32 rep: hex
注意:上述代码中zierc为自定义内容,你想咋填咋填,但是会影响到关于图片位置生成的操作(hexo-asset-image 插件)
由于_config.yml已经设置了 permalink, 这里重复设置,此时构建会报错,所以需要如下图 一样注释一些默认的代码
如果你使用了hexo-asset-image
由于 image 的路径设置是根据 hexo 框架原来的路径走的,所以此时你会发现构建出的网站,图片无法加载node_modules\hexo-asset-image\index.js
在大概第 12 行左右var link = data.permalink;后面添加如下代码,用于定义变量 abbrlink,当然,具体添加到哪里看你自己的喜好,笔者只是为了逻辑清晰
1 var abbrlink = data.abbrlink;
然后在大概第 58 行左右,将代码$(this).attr('src', config.root + link + src);修改为 $(this).attr('src', config.root +'zierc/' +abbrlink +'/'+ src);注意:此处回应前面的提示,修改之后的代码中zierc为自定义内容,你之前填的什么,现在就修改成什么
之后为了防止一些奇怪的问题,直接 hexo 三件套就可以了
双线部署
由于 github 部署访问太慢了
如何实现
首先,请详细观看卷二兔 大佬的b 站视频教程 本文的实现主要是参考了这位大佬。当你观看视频时,可能会发现一些场景和视频中不同,这就是笔者在此的作用了
deploy 配置
_config.yml配置和视频中所示不同,经过笔者尝试,如果按照视频的格式配置,会出现腾讯云和 GitHub 都不会自动部署的问题,经过查看 hexo 的文档和各种资料,笔者得到以下成功的配置方法:
1
2
3
4
5
6
7
deploy: - type: "git" repository: git@github.com:ZiercPro/ZiercPro.github.io.git branch: main - type: "git" repository: coding仓库地址 branch: master
如果这个也无法帮助到你,那可能需要你移步了,对此笔者感到非常抱歉。
如果你发现该视频的方法不行,可以尝试另一位大佬的方法(笔者嫌麻烦没有尝试,但是这已经是笔者能找到的最新的方法了)文档链接->
主题不显示
在切换主题之后,主题不显示,只显示一行文本:extends includes/layout.pug block content include ./includes/mixins/post-ui.pug #recent-posts.recent-posts +postUI include includes/pagination.pug
1 npm install hexo-renderer-pug hexo-renderer-stylus --save
然后重新构建,并在本地测试即可hexo clean 之后再重新运行hexo g
设置背景图片
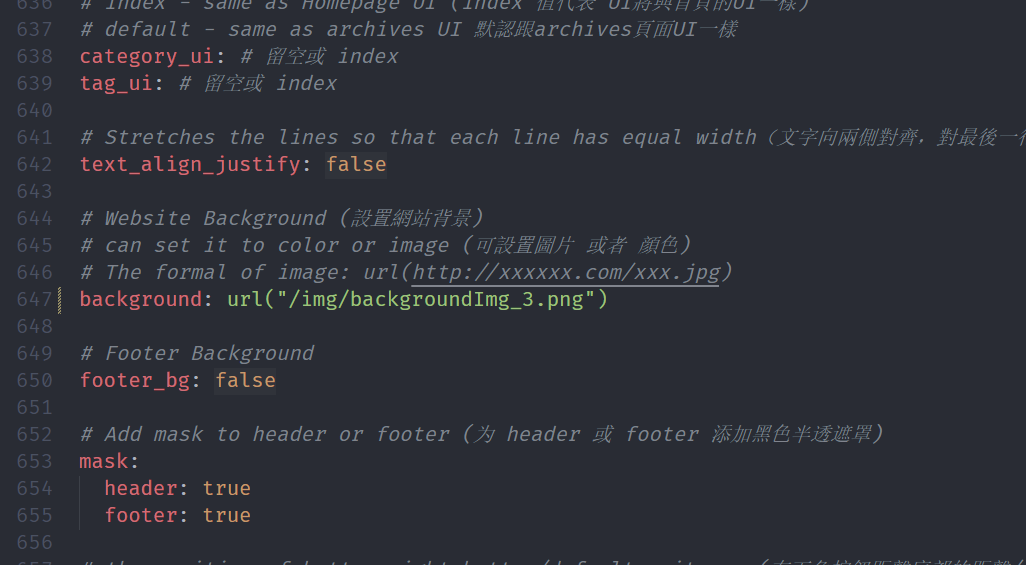
由于笔者没有仔细看 _config.yml 的选项,导致设置背景图片一直在网上寻找陈年方法,都没有效果,浪费了很多时间(4 小时)还没成功,后经过官方大佬点拨发现在_config.yml偏后半段,有background进行背景图片设置,如下图:
因为 background 设置在比较后面,我并没有在官方文档中找到,所以不知道官方文档中有没有(肯定是有的),现身说法,望诸位不要像我一样犯傻
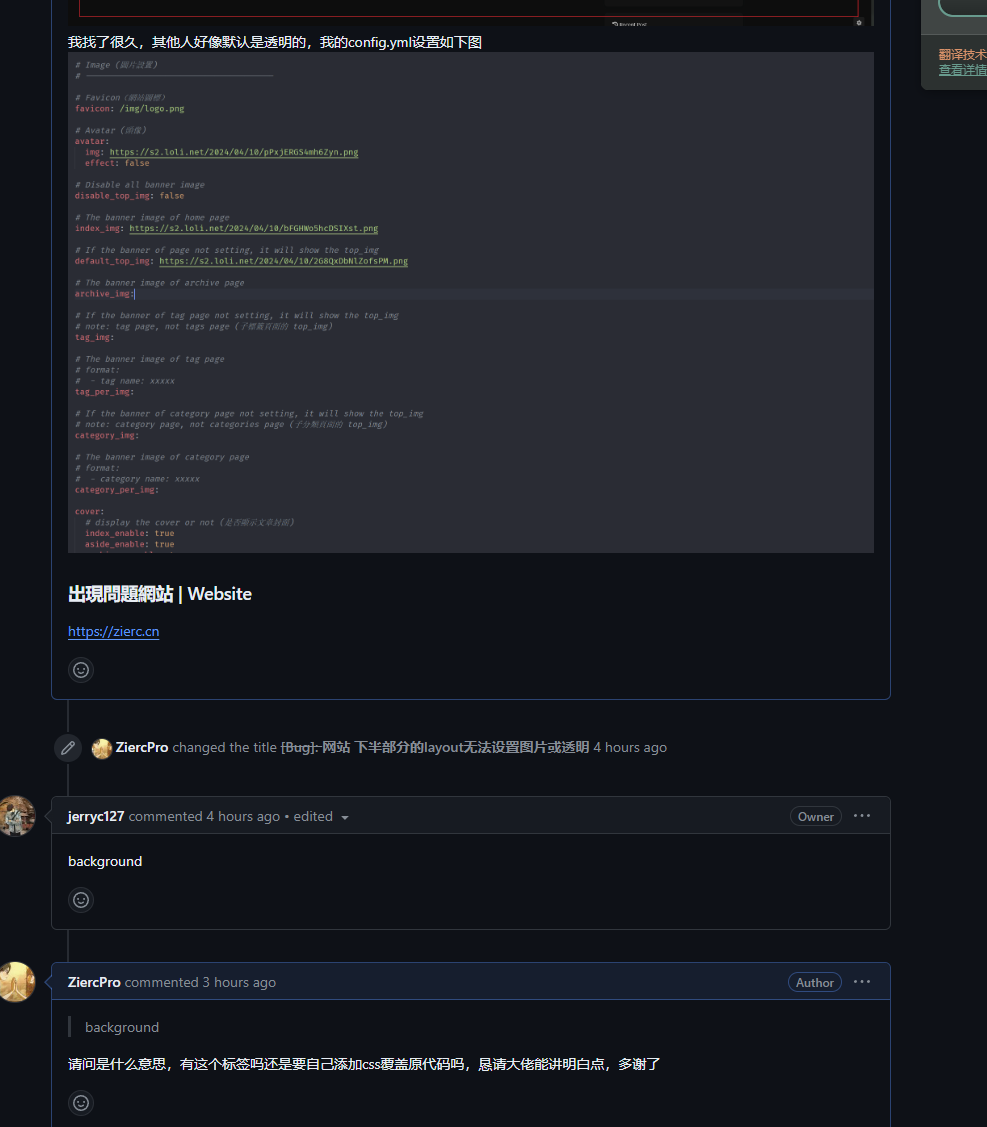
另附一张与官方大佬"斗智斗勇 "的精彩画面。望周知
个性化鼠标指针样式
该鼠标样式原创博客
笔者不了解前端,只是自己加了个渐变色,这里直接给出自己的代码,不多做说明
1
2
3
4
5
6
7
8
9
10
11
12
13
14
15
16
17
18
19
20
21
22
23
24
25
26
27
28
29
30
31
32
33
34
35
36
37
38
39
40
41
42
43
44
45
46
47
48
49
50
51
52
53
54
55
56
57
58
59
60
61
62
63
64
65
66
67
68
69
70
71
72
73
74
75
76
77
78
79
80
81
82
83
84
85
86
87
88
89
90
var CURSOR ;Math .lerp = (a, b, n ) => (1 - n) * a + n * b;const getStyle = (el, attr ) => { try { return window .getComputedStyle ? window .getComputedStyle (el)[attr] : el.currentStyle [attr]; } catch (e) {} return "" ; }; class Cursor { constructor ( this .pos = { curr : null , prev : null }; this .pt = []; this .create (); this .init (); this .render (); } move (left, top ) { this .cursor .style ["left" ] = `${left} px` ; this .cursor .style ["top" ] = `${top} px` ; } create ( if (!this .cursor ) { this .cursor = document .createElement ("div" ); this .cursor .id = "cursor" ; this .cursor .classList .add ("hidden" ); document .body .append (this .cursor ); } var el = document .getElementsByTagName ("*" ); for (let i = 0 ; i < el.length ; i++) if (getStyle (el[i], "cursor" ) == "pointer" ) this .pt .push (el[i].outerHTML ); document .body .appendChild ((this .scr = document .createElement ("style" ))); this .scr .innerHTML = `* {cursor: url("data:image/svg+xml,<svg xmlns='http://www.w3.org/2000/svg' viewBox='0 0 10 10' width='12px' height='12px'><circle cx='3' cy='3' r='6' opacity='.3'/></svg>") 1 1, auto}` ; } refresh ( this .scr .remove (); this .cursor .classList .remove ("hover" ); this .cursor .classList .remove ("active" ); this .pos = { curr : null , prev : null }; this .pt = []; this .create (); this .init (); this .render (); } init ( document .onmouseover = (e ) => this .pt .includes (e.target .outerHTML ) && this .cursor .classList .add ("hover" ); document .onmouseout = (e ) => this .pt .includes (e.target .outerHTML ) && this .cursor .classList .remove ("hover" ); document .onmousemove = (e ) => { this .pos .curr == null && this .move (e.clientX - 8 , e.clientY - 8 ); this .pos .curr = { x : e.clientX - 8 , y : e.clientY - 8 }; this .cursor .classList .remove ("hidden" ); }; document .onmouseenter = (e ) => this .cursor .classList .remove ("hidden" ); document .onmouseleave = (e ) => this .cursor .classList .add ("hidden" ); document .onmousedown = (e ) => this .cursor .classList .add ("active" ); document .onmouseup = (e ) => this .cursor .classList .remove ("active" ); } render ( if (this .pos .prev ) { this .pos .prev .x = Math .lerp (this .pos .prev .x , this .pos .curr .x , 0.15 ); this .pos .prev .y = Math .lerp (this .pos .prev .y , this .pos .curr .y , 0.15 ); this .move (this .pos .prev .x , this .pos .prev .y ); } else { this .pos .prev = this .pos .curr ; } requestAnimationFrame (() => this .render ()); } } (() => { CURSOR = new Cursor (); })();
1
2
3
4
5
6
7
8
9
10
11
12
13
14
15
16
17
18
19
20
21
22
23
24
25
26
27
28
29
30
31
32
33
34
35
36
37
38
39
40
#cursor { position : fixed; width : 24px ; height : 24px ; background : linear-gradient (-45deg , #927aff , #e22c72 , #4d20ee , #42ff29 ); background-size : 400% 400% ; animation : gradientBG 8s ease infinite; border-radius : 12px ; opacity : 0.45 ; z-index : 10086 ; pointer-events : none; transition : 0.2s ease-in-out; transition-property : background, opacity, transform; } @keyframes gradientBG { 0% { background-position : 0% 50% ; } 50% { background-position : 100% 50% ; } 100% { background-position : 0% 50% ; } } #cursor .hidden { opacity : 0 ; } #cursor .hover { opacity : 0.35 ; transform : scale (2 ); } #cursor .active { opacity : 0.7 ; transform : scale (0.75 ); }
但是这个鼠标样式还有个小问题,那就是鼠标如果在复制代码的按钮上时,会变回原指针
暂无解决方案
按照原作者的意思,应该会检测元素中是否有cursor:pointer 于是笔者通过浏览器控制台,发现 copy 代码的按钮类名为fas fa-paste copy-buttonhighlight.styl文件中,关于copy-button代码如下
1
2
3
4
5
6
7
8
.copy-button position: absolute right: 14px cursor: pointer transition: color .2s &:hover color: $theme-color
这让笔者一脸懵逼,理论上来说应该能检测到cursor:pointer的啊
提一嘴,笔者专门去其他人的博客中对比了,似乎这个问题并不针对这款鼠标样式,其他鼠标样式修改方法,同样检测不到 copy 按钮,会恢复原鼠标样式
先找到 butterfly 文档 中的评论,它会让你跟随gitalk 的教程,内容简单易懂
关于配置,笔者来帮忙避坑
1
2
3
4
5
6
7
8
#注意,到admin之前都需要加双引号,内容写到引号中 gitalk: client_id: "" #填写id client_secret: ""#填写secret repo: ""#填你的库名称,直接复制过来就可以了,笔者 使用的是托管网站的仓库,即ZiercPro.github.io owner: ""#填写自己的github用户名,笔者就是ZiercPro admin: ["ZiercPro"," ",...]#填写能修改你仓库的人名,如果只是用于自己的博客网站,只需要和owner中填写的一样即可 option: #笔者没有设置
笔者的吐槽
笔者搭建过程中,一大感触就是,怎么感觉他们的过程和我的有点不一样,似乎很多文章都有点过时了。尽管最后,这些文章大概率依旧能够帮到笔者,但是总是会让笔者陷入混乱:这里到底该这样还是那样,为什么呢。当然,这个问题和有些平台或工具更新过快 也脱不了关系。
结语
这是笔者第一篇文章,诸多问题,不用谅解,直接来找我私聊即可(
参考文献:小茗大佬 https://www.cnblogs.com/liuxianan/p/build-blog-website-by-hexo-github.html 主题不显示问题 https://www.jianshu.com/p/aa936a8369fb 花桑大佬 https://www.drflower.top/posts/5920b38e/ 卷二兔大佬 https://blog.juanertu.com


 微信
微信 支付宝
支付宝